From Snapshot to Studio Shot

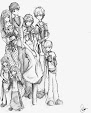
 I had a request from my sister-in-law to try and do something with this photo so she could give it as a gift. All of the kids look good (a great accomplishment!) but just looked snapshot-ish with the stairs in the background.
The first thing I did was do a levels adjustment and sharpened the image (using the unsharp mask in Photoshop CS).
Next, I created a layer mask and masked out the background. I did this with a round brush set at about 80% hardness.
The next step was to create a new layer beneath the kids. I then chose two coordinating colors for the foreground and background colors. I chose a really dark blue(almost black) and a slightly lighter blue. Then I rendered clouds (Filter>Render>Clouds) to create a mottled background. This reminds me of a photo studio background.
To add to the realism, I wanted to mimic a studio light shining on the backdrop. I did this by using Filter>Render>Lighting Effects. In the window that opened, I chose a white colored spotlight and played with the size and intensity until I was happy with it.
So the kids would look more like the were really in front of this backdrop, I went back to their layer and added a drop shadow. I increased both the distance and the size to 38 and adjusted the angle.
The final addition was the year in the corner. This was done using the text tool and then adding a bevel and emboss layer style.
There you have it... a very simple way to go from snap-shot to studio-shot.
posted by Trish @ 2:09 PM
0 comments
![]()
![]()